Background #
Gladly can import historical conversations (and their corresponding contact information) from several popular customer service platforms. If you are using a different platform that is not yet natively supported, we can still import your historical data if you export it to a Gladly-compatible format.
Note that imports must be associated with a valid email address. Imports without a valid email address will be rejected. Other than customer contact information (i.e.: name [if exists], phone [if exists], email), imports are not searchable nor reportable.
Also note that Gladly does not support the import of historical images, recordings, attachments, metrics, or routing/conversation assignments – that is, the Gladly import is text-based only.
Note – Historical data import fee
Historical Imports are subject to a small Professional Services fee. If you are interested in importing historical data into Gladly and have not purchased a historical import add-on, please contact your Gladly representative for more information.
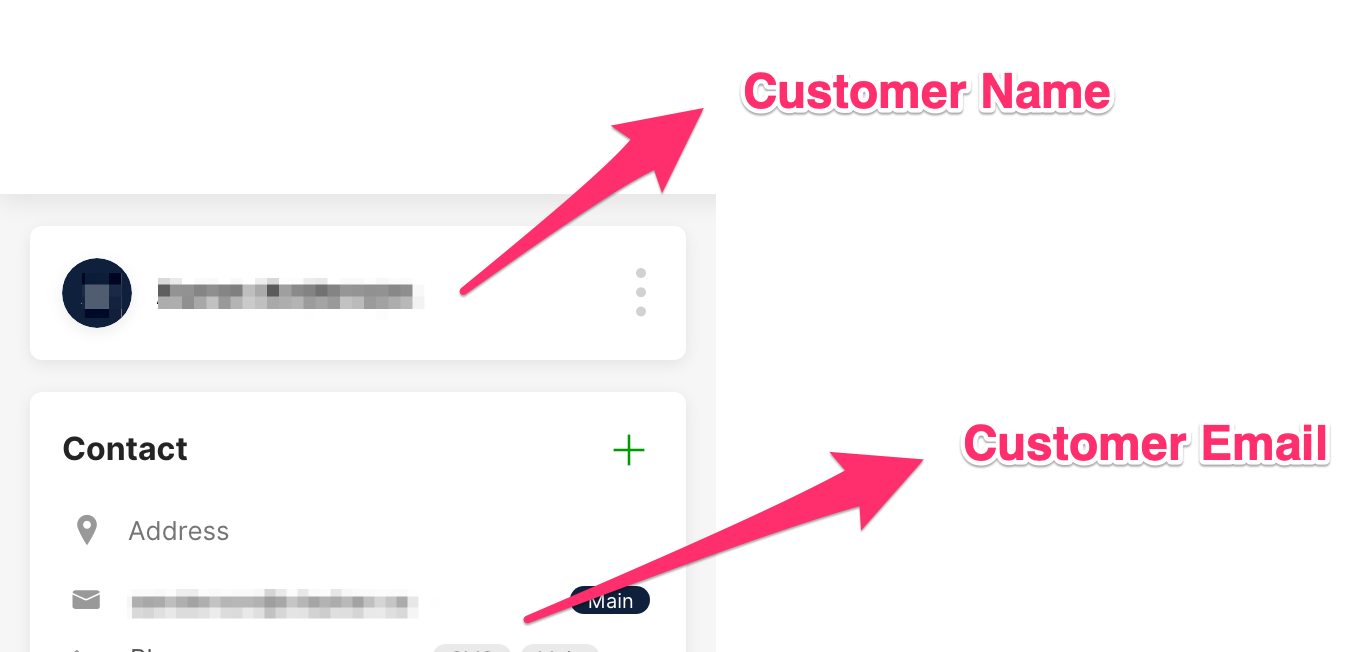
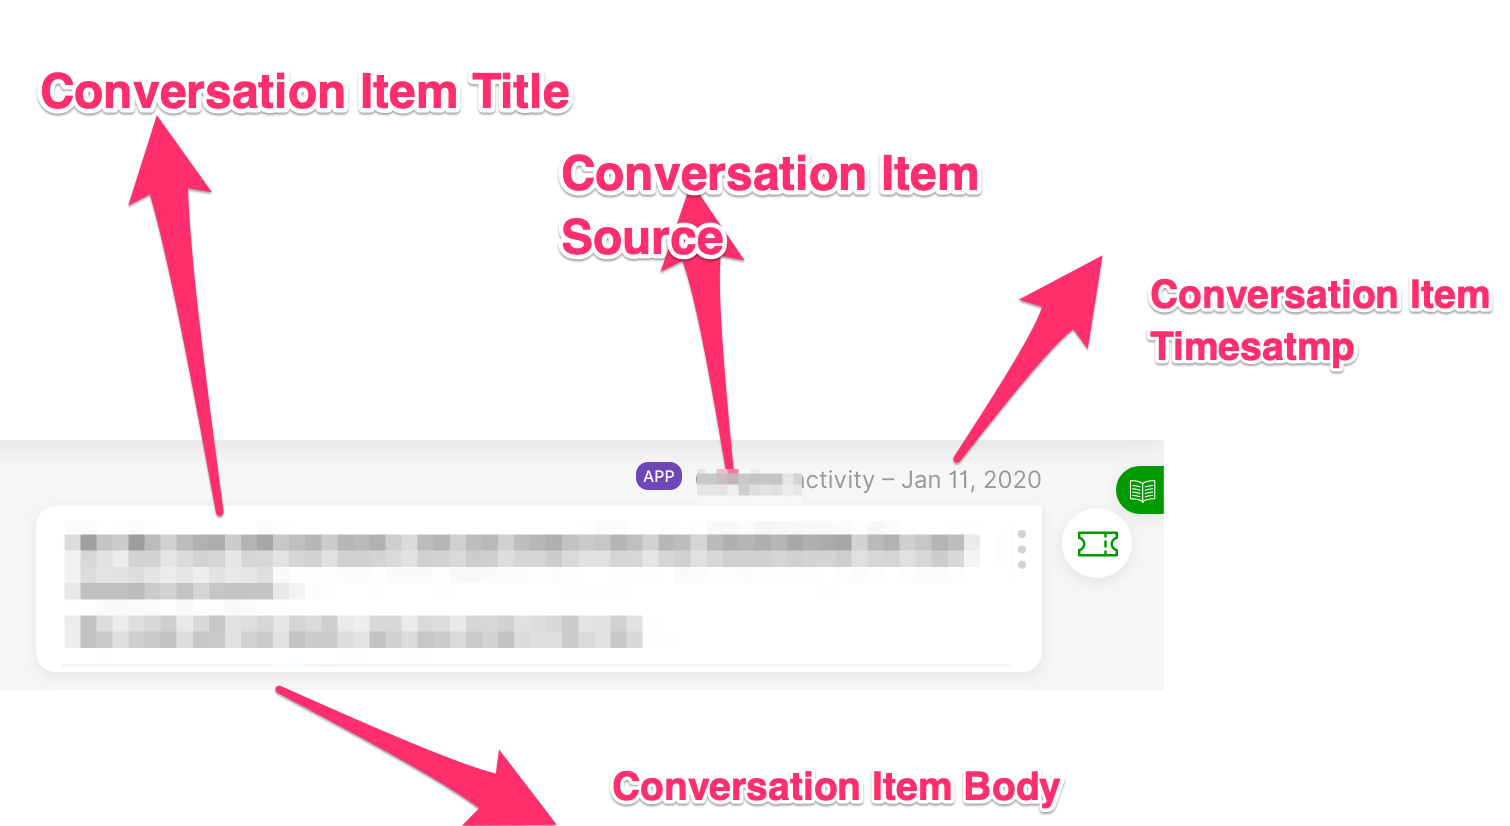
The import will look like the following:
Customer Contact Card

Conversation Item

Goals #
Export your historical conversation items and import them into Gladly so that the next time a customer contacts you, you will have their full contact history available to refer back to.
Estimated Effort #
30 min for export from out-of-the-box supported platforms:
Step-by-Step Tutorial & Best Practices #
If the bulk conversation item data import is not defined in your SOW, please contact your implementation team for a quote.
Zendesk #
- Follow instructions on Zendesk to export your data in JSON format
- Upload the exported JSON to the Gladly Dropbox link provided by the Gladly Implementation Team
Note: The Gladly Professional Services Team can also assist with the export during the onboarding process.
The following fields are mapped for each Zendesk ticket comment using the following object format:
- Conversation Item Timestamp: created_at
- Conversation Item Title: subject
- Conversation Item Body:
- Tags: ticket tags (comma-delimited)
- html_body
- Conversation Item Source: Zendesk
- Customer Email: requester.email
- Customer Name: requester.name (if exists)
- Customer Phone: requester.phone (if exists) – imported as OTHER type
Kustomer #
- Login to Kustomer as an Admin and go to Settings > API Keys
- Click on +Add API Key
- Name the API Key “Gladly”
- Assign the following permissions
org.admin.message.read
org.admin.search.read
org.permission.conversation.read
org.permission.customer.read
org.permission.message.read
org.permission.search.create
org.permission.search.update
org.permission.search_global.create
org.permission.search_preview.create
org.user.conversation.read
org.user.search.read
org.user.customer.read - Set Expiration to 365 days
- Click on Create
- Copy the resultant API key in a txt file and upload it to the Dropbox repository provided to you by your implementation team
When Gladly imports data from Kustomer, Gladly will retrieve a list of historical messages from Kustomer along with customer details.
Gladly will then map the data from conversation Messages and Customers in this manner:
- Conversation Item Timestamp: message.attributes.createdAt
- Conversation Item Title: message.attributes.subject (note that this may be set to a default value of “Kustomer message” if the subject does not exist – which typically occurs in a Chat message). Subject will get truncated at 100 characters.
- Conversation Item Body: message.attributes.preview. Body will get truncated at 25,000 characters.
- If message.attributes.preview is not found, but message.attributes.meta.from and message.attributes.meta.to is found, then this text defaults to: Communication sent from ${message.attributes.meta.from} to ${message.attributes.meta.to} on ${message.attributes.createdAt} via ${message.attributes.channel || ‘unknown channel’} using ${message.attributes.app || ‘unknown app’}. Kustomer API did not return communication contents to import.
- Otherwise, this text defaults to “Kustomer message”
- Note: when message.attributes.preview is not found, it is likely an external record utilizing a separate app (e.g.: phone call via talkdesk, or SMS without via Twilio) was received or sent
- Conversation Item Source: Kustomer
- Customer Email: GET Customer associates with message.relationships.customer.links.self and retrieve 1st email in customer.data.attributes.emails – if no customer email detected, message cannot be imported
- Customer Name: GET Customer associates with message.relationships.customer.links.self and retrieve customer.data.attributes.names
- Customer Phone: GET Customer associates with message.relationships.customer.links.self and retrieve 1st phone in customer.data.attributes.phones – imported as OTHER type if it exists
Gmail #
Gmail exports can be huge in size (+10 GB) so it’s important to export only the emails you need by searching for them in Gmail and then applying a label.
- First create a label using Gmail’s label feature to tag the emails that are import for export. Name your label something easy to remember such as gladly-export
- Isolate the emails you want to export by searching for them and then applying a label to them. Useful search parameters include:
- after a certain date:
after:01/01/2021 - removing automated reports by adding a minus in front of the search term:
-from:"square" - remove out of office replies and bounce backs
-from"mailer-daemon"-subject:"Out of Office" - removing exceptional large emails:
-size:10mb - These search parameters can be combined in a single search by separating them with spaces:
after:01/01/2021 -from:"square" -from:"mailer-daemon" -subject:"Out of Office" -size:10mb
- after a certain date:
- Apply your label to these emails
- Next, log into your support Gmail account and visit https://takeout.google.com/settings/takeout
- Click the “Deselect all” link at the top of the screen so that all of the blue checkboxes go Away; you’ll only want to export Mail
- Now, scroll down to the “Mail” option and check the box to the right to select this option

- Click on the “All mail data included” button to refine the export
- In the modal window, deselect “Include all messages in Mail” and instead only check the tag you created
- Next, scroll to the bottom of the list of export options and click the blue “Next Step” button
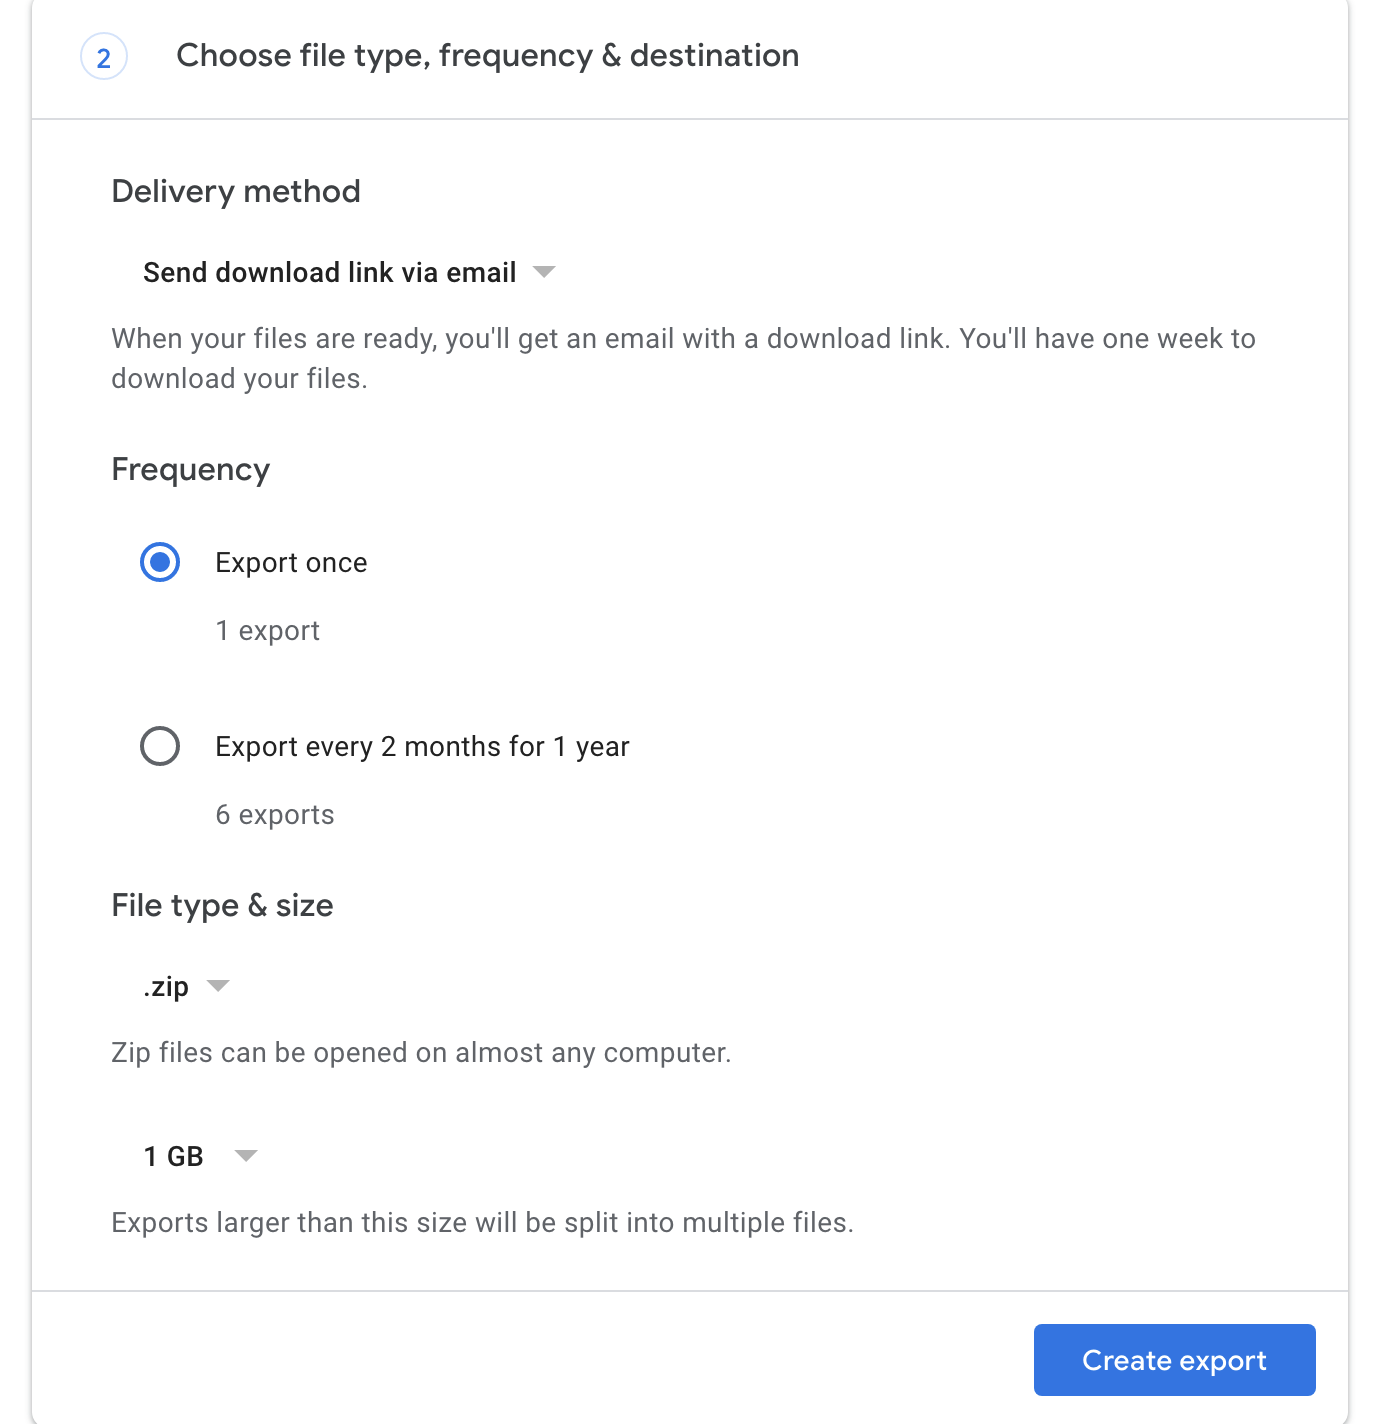
- In the “Choose file type, frequency & destination” section, set the dropdown value for “Exports larger than this size will be split into multiple files” to 1 GB

- Click the “Create export” button
- Open the email inbox associated with your export as you will receive an email to confirm the export. Please approve this request!
- Wait for the export to finish – this usually takes 30-45 minutes per 1 GB
- You will receive an email when the export is complete with directions for downloading the export
- Open up export file provided and locate the .mbox file
- Finally, upload the .mbox file to the Dropbox link provided by Gladly
The following fields are mapped for each email in the export:
- Conversation Item Timestamp: email date
- Conversation Item Title: email subject
- Conversation Item Body: email (text content)
- Conversation Item Source: GMail
- Customer Email: email from if received by you; 1st email to if sent by you
- Customer Name: email from name (if exists) if received by you; 1st email to name (if exists) if sent by you
- Customer Phone: N/A (not imported)
Gorgias #
Add your Gladly Professional Services lead as an Administrator to your Gorgias account. Our team will be able to assist you with the export process.
The following fields are mapped for each Gorgias message in each ticket:
- Conversation Item Timestamp: created_datetime
- Conversation Item Title: subject
- Conversation Item Body: body_text
- Conversation Item Source: Gorgias
- Customer Email: customer.email (may not always exist)
- Customer Name: customer.name (may not always exist)
- Customer Phone: N/A (not imported)
Freshdesk #
- Login to Freshdesk as an administrator
- Go to Admin -> Account -> Account Details >Export data
- Click on the Export button
- In a few hours, Freshdesk will email you an export of all your tickets
- Unzip the file and upload all of the XML files into the Dropbox link that your Implementation Manager sends you
The following fields are mapped for each Freshdesk ticket:
Import 1st ticket comment:
- email: Get user.email for the requester-id in Tickets XML file (the person initiating the ticket) using Users XML file
- name: requester-name in Tickets XML file
- phone: Get user.phone for the requester-id in Tickets XML file (the person initiating the ticket) using Users XML file
- subject: Ticket # ${the ticket ID from XML file} – ${subject from XML file}
- body: 1st comment (aka description in Tickets XML file)
- createdAt: created-at in Tickets XML file
- source: Freshdesk
Import subsequent ticket comments:
- For each helpdesk-notes (Freshdesk’s version of Gladly conversation items) associated with this ticket, import the following:
- Same as above, except the body is going to be set to the body field for each helpdesk-note
Other Platforms #
- Insert conversation items you wish to import into the attached template, being careful to follow the exact instructions located in the following file: Conversation-Import-CSV-Sample.csv
- We recommend conducting the import in batches of 500K rows two weeks before launch and one more import two days after launch to cover the delta.
- Upload the above CSV to your Gladly Dropbox link and notify your Gladly implementations team.
Tip – Need Help Converting to CSV?
There are many tools online that may help you transform your system’s old help content into a CSV. For example, https://help-desk-migration.com/how-it-works/ may have plugins to assist you with a CSV file download. You will likely need to do additional alterations on the resultant CSV to get it to the Gladly format.
Please also note that Gladly will NOT import any data without at least a well-formatted customer email address and a valid body (<=25K characters) & title (<=100 characters.)


