| REQUIRED USER ROLE Administrator |
| Connect Learning Available in eLearning format in Connect Learning |
Add domains that will be used to send and receive Customer emails from Gladly.
Before you start #
Before you add your domain, we recommend that you first do the following:
- If you’re adding your very first domain, note that email setup is a three-part process where you add your domain, configure your DNS records, wait for it to be verified, and then add your email addresses.
- Remember that newly added domains will carry an “Unverified” status during the setup process until your DNS provider can confirm your domain SPF and DKIM records.
- You only need to add a particular domain once unless you have another domain to add.
Add your domain #
- Click
 on the top left corner of the screen.
 - Click Settings.
- Under the Channels category, click Email.
- The next step depends on whether there’s no existing or at least one domain configured.
Watch Out – Use lowercase letters only when adding Email domain(s)
When using Email domain(s) please use only lowercase letters. If you accidentally add an Email domain with uppercase letters, contact Gladly Support with a P4 designation to assist you with updating the domain. This will also change the DKIM & SPF records you will need to install.
No existing domain #
Before proceeding to add a new domain, remember that a domain cannot be deleted or changed once added.
- From the Add a sending domain to get started with email prompt, enter your domain name (e.g., retale.com) and click Save and Continue.
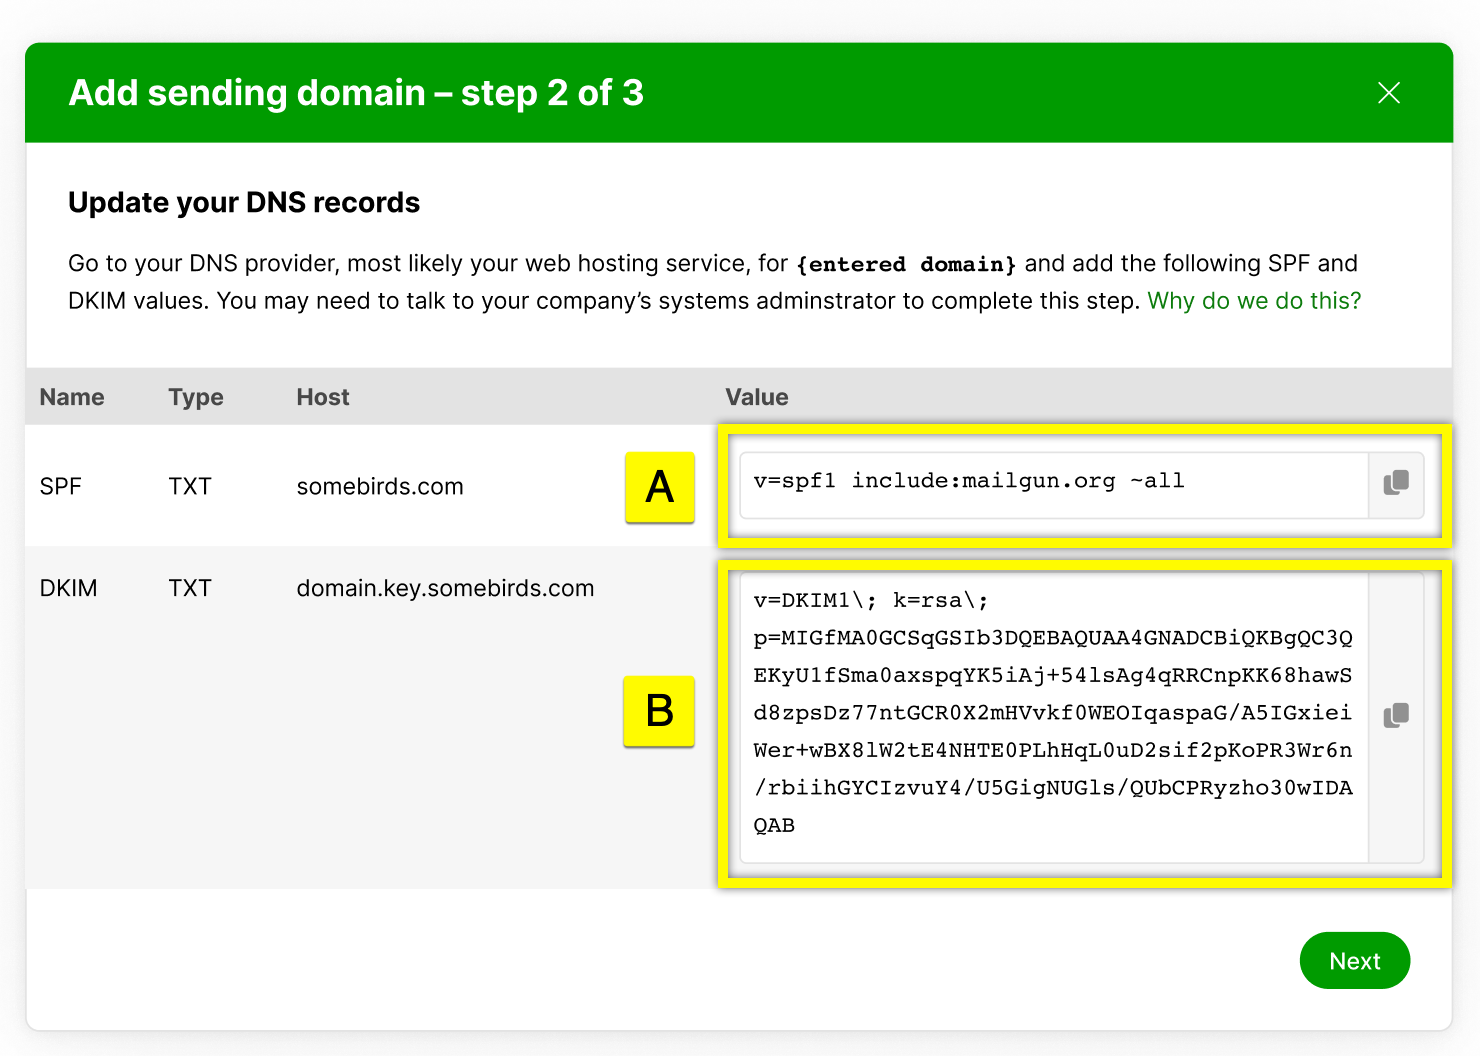
- Next, you’ll be asked to update your DNS records using the SPF and DKIM values in this section.
- [A] – SPF: Copy and paste this value into your domain provider’s DNS setting as TXT type.
- [B] – DKIM: Copy and paste this value into your domain provider’s DNS setting as TXT type.
- Go to your DNS provider’s DNS settings page in a new browser tab and paste the SPF and DKIM as TXT (type) values you copied from Gladly. This step is required to verify your domain. We’re unable to see which DNS provider you have, so below is a list of several common providers with a link on how to update the SPF and DKIM records:
- Once your DNS records are updated, return to Gladly and click Next.
- You’ll see a notice stating you must wait for your DNS provider to confirm the SPF and DKIM records you added, which can take up to 72 hours. Until it’s approved, the domain will have an “Unverified” status.
- Unverified – The DNS records for your sending domain have not been verified and updated.
- Verified – The DNS records have been verified, and the domain is ready for use.
- Click Add Another Domain to add another domain. Otherwise, click Done. This will take you back to the Email screen. You should now see the domain you added with an “Unverified” status.


Check back in 72 hours to see if the SPF and DKIM records have been verified. Once verified, SPF and DKIM should have a “Verified” status. Now, you can add email addresses associated with the added domain.
Have one or more domain #
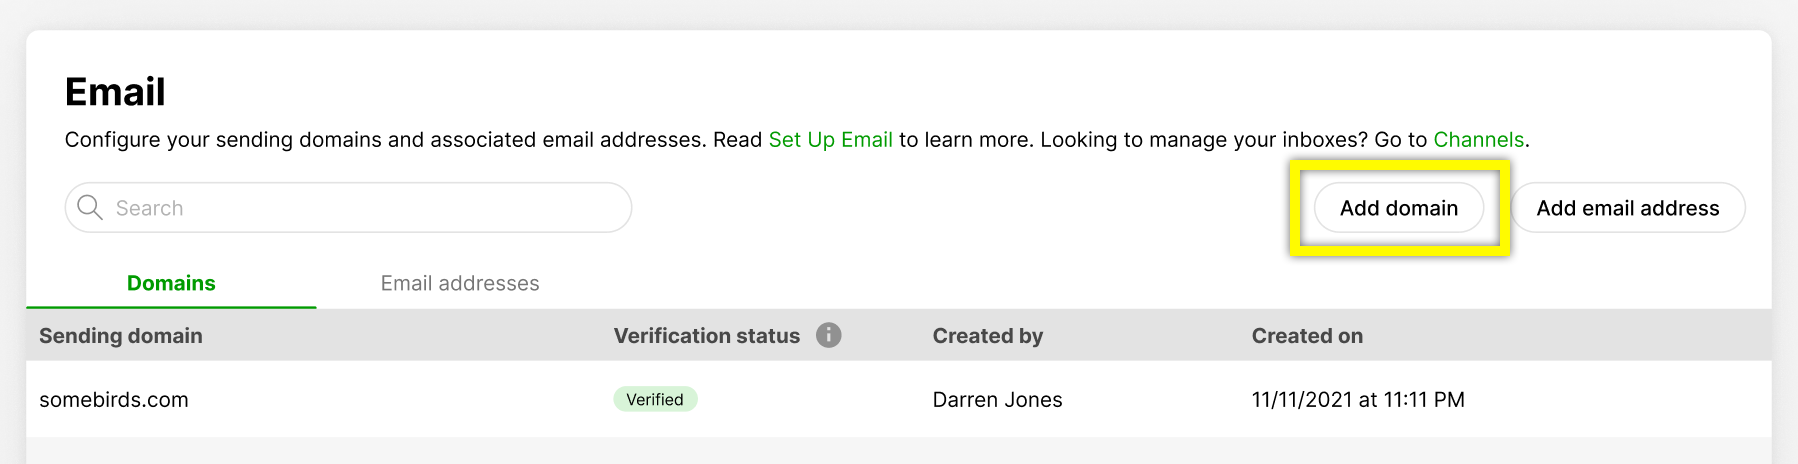
- From the Email screen, click Add Domain.
- To view a list of existing domains, click on the Domains tab.
- Enter your domain name (e.g., retale.com) and click Save and Continue.
- Note – Domain name can’t be changed once saved.
- Next, you’ll be asked to update your DNS records using the SPF and DKIM values in this section.
- [A] – SPF: Copy and paste this value into your domain provider’s DNS setting as TXT type.
- [B] – DKIM: Copy and paste this value into your domain provider’s DNS setting as TXT type.
- Go to your DNS provider’s DNS settings page on a new browser tab and paste the SPF and DKIMTXT (type) values you copied from Gladly. Since we’re unable to see which DNS provider you use, here’s a list of several common providers with instructions on how to update the SPF and DKIM records:
- Once your DNS records are updated, return to Gladly and click Next.
- You’ll see a notice stating you must wait for your DNS provider to confirm the SPF and DKIM records you added, which can take up to 72 hours. Until these records are verified, the domain will have an “Unverified” status.
- Unverified – The DNS records for your sending domain have not been verified and updated.
- Verified – The DNS records have been verified, and the domain is ready for use.
- Click Done. This will take you back to the Email screen. You should now see the domain you added with the “Unverified” status.
Check back in 72 hours to see if the SPF and DKIM records have been verified. Once verified, SPF and DKIM should have a “Verified” status. You can then proceed to add email addresses associated with the domain.
Once the domains are set up, contact Gladly Support to set up the reply-to address.
Set up a `reply-to` domain address #
Once the sending email domain is set up, create a reply-to email address so that replies are sent to the desired reply-to address regardless of the domain address used to send outbound emails. For example, suppose outbound emails will technically come from [email protected], the reply-to address can be set so replies are sent to [email protected] instead.
Contact Gladly Support to set up the reply-to address. Once the reply-to address is set up, set up email forwarding using the Gladly-generated address, so email replies are forwarded to Gladly.
Check verification status #
You can manually check the status of your SPF and DKIM records by forcing an update request.
- From the Email page, hover over the domain you want to check the status and clickon the right side of the domain, then click Check Verification Status.
- Wait a few seconds, and you’ll see a message either showing if the records have been verified or are still waiting to be verified. Verifying the domain may take up to 72 hours, even if you request an update.
Use the same SPF record for multiple domains #
If you already have an existing SPF record for your domain, you can append the Gladly provided SPF record to the existing record. The SPF recording should follow the format below.
v=spf1 include:spf.protection.outlook.com include:mailgun.org -all
For example, if you have an existing SPF record:
v=spf1 include:spf.protection.outlook.com -all
Your record already has v=spf1 and -all, so you just need to append include:mailgun.org to look like this:
v=spf1 include:spf.protection.outlook.com include:mailgun.org -all
Be sure that v=spf1, include:mailgun.org, and -all exist in your SPF record by appending what is needed.
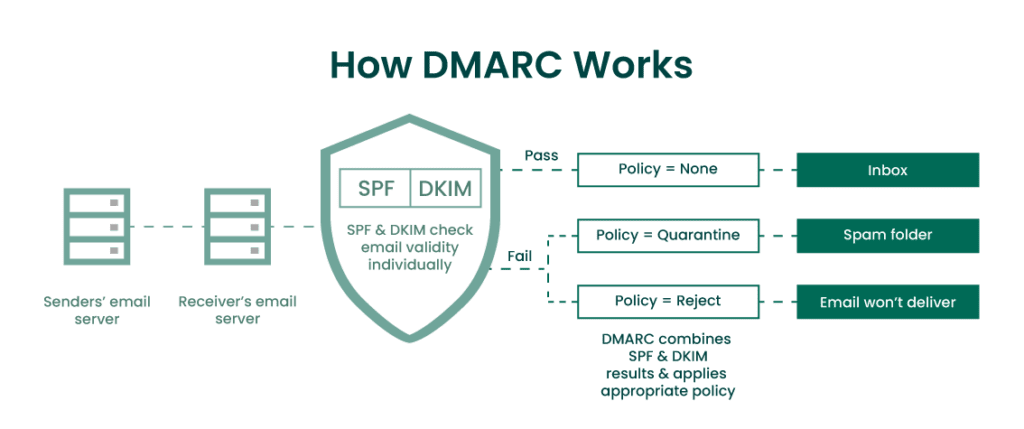
Configure DMARC to prevent phishing and spoofing #
Domain-based Message Authentication, Reporting, and Conformance (DMARC) helps protect against phishing and spoofing while preventing messages from being marked as spam.
You can use tools like mxtoolbox and dmarcian first to confirm if DMARC Policy and Reports are already set up for your domain. If not, see instructions below from popular providers on how to set up DMARC.